Kohler Carburetor Linkage Diagram – [Diagram & Setup Instructions]
It’s normal for you to get perplexed if I describe the linkages and components in words. However, understanding the Kohler carburetor linkages diagrams helps in troubleshooting, repairing, or replacing the carb system.
Generally, in the Kohler carburetor linkage diagram, you will find external linkages like choke linkage, throttle linkage, and governor linkage. Besides, there will be internal linkages like pins, screws, gaskets springs, fuel bowls and float kits.
The main goal of this article is to discuss the placement and functions of external and structural linkages of this carb. So, without further ado, let’s start.
Kohler Carburetor Linkage Diagram [External Linkages]
The Kohler Carb will have external linkages and internal linkage components, working together to control the air-fuel mixture of the engine. Here, I can give you a general overview of common carburetor external linkages:

Kohler Carburetor Linkage Diagram (Image source)
Let’s know in detail about these external linkages:
1. Choke Linkage
The front linkage with the mounting bolts at the top of the carburetor is the choke linkage. This helps to control the choke valve of your carburetor. Generally, the lever of the choke thermostat will connect with the choke plate lever of the carb through the choke linkage. This thermostat lever is responsible for blocking the airflow through the car when you are starting the engine.
Generally, this blocking is necessary for the air-fuel mixture enrichment until the engine gets warm. Once the engine of your vehicle warms up, this choke linkage will ensure that the choke opens.
You will find that another end of this choke rod is attached to the governor through a Z bend. Besides, the choke lever of the governor is also connected to the choke cable.
2. Throttle Linkage
Behind the mounting of the choke linkage, there will be another mounting for the throttle linkage. In the governor, a lever will have a connection with the throttle cable. You will notice that the lever contains a solid link and spring which attach to the carburetor.
The solid linkage connects the throttle lever on the carburetor. When you step on the gas, the cable will get pulled. As this force will pass through the throttle linkage, the throttle plate will also open.
Consequently, it will allow enhanced flow of the air and fuel into the vehicle’s engine. By controlling the entrance of the air fuel into the engine, the throttle link will regulate the engine speed.
3. Governor Linkage
Generally, models like Kohler SV470, SV471, SV480, SV 530, Ch740, etc will contain this linkage. In the past, I used to own a Kohler Small Engine CV15/41502, which didn’t have this linkage.
You can find a hole near the throttle linkage mounting. The governor link attaches to the carb through this hole. This spring link will apply tension on the governor’s arm so that the carb throttle can remain open. As a result, you will achieve higher rpm in your vehicle.
Sometimes, due to applying sudden load the throttle tends to close and reduce the engine speed. In this case, the governor spring will help to provide more air and fuel to the engine. As a result, this force will be equivalent to the governor gear force and will increase the rpm even in higher load.
With these three main external linkages, you will also find two gaskets there. Generally, these gaskets will make tight seals between the carb and the engine block. Moreover, you will find a fuel line entering the fuel bowl section of the carburetor.
To replace the carburetor, you have to detach all these linkages first to pull it out of the vehicle. I am providing you with a video that will help you to understand the linkages better, plus you’ll learn how to detach those linkages from the Kohler carb.
Structural Linkage Diagram of Kohler Carburetor
Your Kohler carb contains many internal and structural parts that also help in controlling the fuel-air mixture. Those linkage parts have pins, screws, and other essential parts. Here is an image of the parts that you will find upon disassembling the carb to understand those internal linkages better:
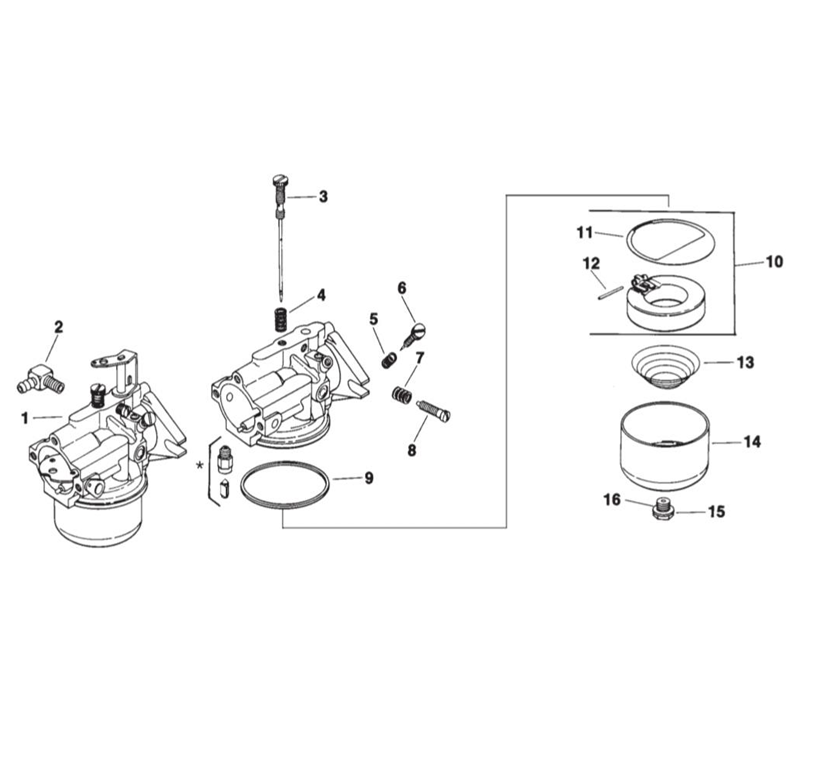
Structural Linkage Diagram of Kohler Carburetor (Diagram source)
Those numbers refer to the different linkage parts of the carburetor. Here are the names of those parts:
| Identification No. | Name of the parts |
| 1 | Carburetor |
| 2 | Hose connector |
| 3 | High-speed adjusting needle |
| 4 | High-speed adjusting needle spring |
| 5 | Idle needle spring |
| 6 | Idle adjusting needle |
| 7 | Idle screw spring |
| 8 | Idle adjusting screw |
| 9 | Bowl gasket |
| 10 | Float kit |
| 11 | Bowl baffle gasket |
| 12 | Float pin |
| 13 | Float spring |
| 14 | Fuel bowl |
| 15 | Bowl retainer screw |
| 16 | Bowl retainer screw gasket |
Let’s know in detail about these structural linkages of the carb.
1. Carburetor
All carburetors will have identification part numbers of their bodies. This indicated their specific models. Multiple screws, springs, needles, pins, gaskets, float lits, etc will function together as structural linkages of the carb.
2. Hose Connector
Hose connectors generally serve as an inlet of lines. It connects to the fuel line from the fuel tank. Besides, carburetors may have hose connectors for vacuum lines.
Read Next: John Deere 48 Inch Mower Deck Belt Diagram With Routing Guide
3. High-Speeded Adjusting Needle
This needle functions to fine-tune the air-fuel mixture at higher engine speeds. You can make the mixture leaner by turning the needle clockwise. When you turn it counterclockwise, the mixture will get richer.
4. High-Speed Adjusting Needle Spring
This is a small spring that applies tension to the high-speed needle valve. Hence, it can control the amount of fuel flowing into the engine at high RPMs. So, if you want to fine-tune the air-fuel mixture for optimal performance, you need to adjust this tension.
5. Idle Needle Spring
This spring provides tension to the idle speed adjustment needle. As a result, the needle can maintain its position once you set it. This ensures that the carburetor maintains a consistent idle speed and fuel mixture.
6. Idle Adjusting Needle
When you are fine-tuning the air-fuel mixture at the idle speed of an engine, you need to adjust this needle. This will ensure smooth and efficient operation when the engine is idling.
7. Idle Screw Spring
This spring will provide tension to the idle speed screw. When you adjust the position of the screw, this spring will maintain the position of the screw. This will ensure the engine runs at a consistent idle speed.
8. Idle Adjusting Screw
This adjusting screw will function to control the engine’s idle speed. When you are turning this screw, it controls the amount of air entering the engine at idle. Consequently, it will affect the engine’s idle speed. In my Kohler K21 model, I need to set the RPM at 1200 RPM(±75 RPM) in the idle speed setting for carb adjustment.
9. Bowl Gasket
Generally, it’s a rubber or rubber-like seal that you will notice between the carb’s body and the bowl. This can create an airtight seal, preventing fuel from leaking out of the carburetor bowl.
10. Float Kit
The float kit consists of 3 essential parts: a float, a pin, and a bowl gasket. These three parts function to ensure a proper mixture of fuel and air.
11. Bowl Baffle Gasket
The gasket you will find between the carb’s float bowl and the main body of the carb is the bowl baffle gasket. It generally provides a seal that prevents the sloshing around of the fuel from the bowl.
12. Float Pin
Generally, the float pin enters through a hole in the float arm and through a hole in the float itself. This attachment secures the float to the float arm, allowing them to move together as a unit. It also allows the float to pivot freely within the carburetor’s float bowl.
13. Float Spring
You will find that the one end of the float spring connects to the float arm. Another end attaches with a fixed point within the Kohler carb. The main function of this spring is to provide tension against the upward movement of the float. Thus, the float won’t rise too rapidly for a minor change in fuel level.
14. Fuel Bowl
The fuel bowl is a bottom chamber of the carb and stores a certain amount of fuel. Inside the fuel bowl, you can see a float and a needle valve. When the fuel level is low, as the float drops, more fuel will enter the bowl.
But, when the float rises with the fuel level, the needle valve will cause and prevent additional fuel from entering.
15. Bowl Retainer Screw
This retainer screw has a threaded surface to fit into a threaded hole in the carburetor body. It will pass through the float bowl and engage with the threads of the carb. As a result, it will hold the bowl firmly in its proper alignment.
16. Bowl Retainer Screw Gasket
Before tightening the bowl retainer screw, you need to put a gasket around the screw threads. This gasket provides a proper seal between the screw and the carb’s body. This will help to maintain the integrity of the float bowl by preventing fuel leaks.
Kohler Carburetor Linkage Diagram Related (FAQs)
In this FAQs section, I will answer several most common questions about the Kohler carburetor linkage diagram.
What Type Of Problems Will Arise If My Kohler Carb Linkage Gets Damaged?
Poor fuel economy, fuel leaks, and rough stalling are a few common problems that will arise due to damaged linkage. Your vehicle will also hesitate while accelerating, and starting the vehicle will also be difficult.
What Happens If The Float Pin Of The Internal Linkage Diagram Of Kohler Carb Gets Out Of Placement?
When the float pin isn’t in proper alignment, the float won’t pivot accurately within the float bowl. Thus, fuel level won’t also be precise causing inappropriate fuel levels. Sometimes, it also results in engine flooding.
More Resources and article links:
![john deere 54 inch mower deck belt diagram - [Just 3 Checkpoints]](https://dillongarden.com/wp-content/uploads/2023/09/John-Deere-54-Inch-Mower-Deck-Belt-Diagram.gif)

![42 Inch Cub Cadet Mower Deck Belt Diagram: [A Visual Guide]](https://dillongarden.com/wp-content/uploads/2023/09/42-Inch-Cub-Cadet-Mower-Deck-Belt-Diagram.gif)
